How to use voice in Character.AI
The Character.AI chatbot service includes several features to optimize your AI communication experience. The main function of Character.AI is a text-to-speech chatbot that allows you to enter queries and read responses from various characters, including modern and historical characters, popular fictional characters, and helpful characters, among others. However, you can also implement a voice function […]
The Character.AI chatbot service includes several features to optimize your AI communication experience. The main function of Character.AI is a text-to-speech chatbot that allows you to enter queries and read responses from various characters, including modern and historical characters, popular fictional characters, and helpful characters, among others. However, you can also implement a voice function that allows you to listen to character responses with a human voice. This can work as an accessibility option, or if you just don’t feel like reading your answers.
Character.AI lets you enable voice options on third-party characters you interact with and also lets you upload custom voices for characters on your own account. Here are the ins and outs of working with voices on Character.AI.
Character.AI
how to enable voice on a third-party character
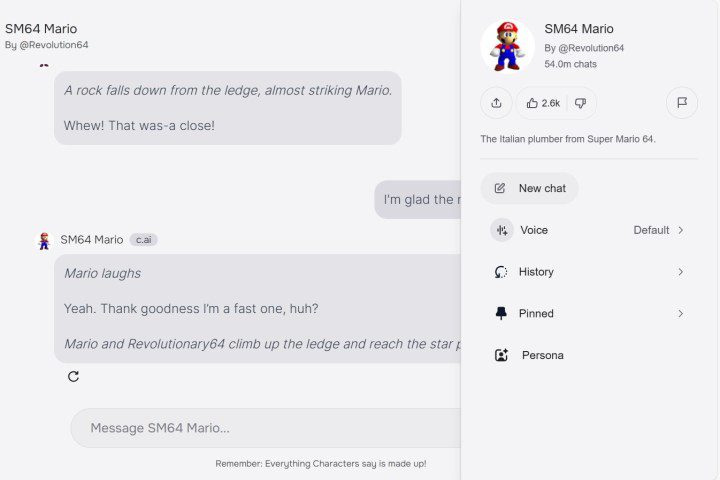
As noted, the voice feature enabled on Character.AI allows you to hear a character’s voice when they respond to your comment or query in a conversation. Let’s say you’re chatting with a Super Mario character who might look like the famous voice-enabled plumber.
Step 1: To enable voice for a chat with a third-party character, open a chat and click the sound icon that looks like sound lines with a slash through them.
This will automatically activate the voice and the icon will turn blue. You will also see a voice-activated a notice appears and disappears quickly.
2nd step: Alternatively, you can click on the three dots icon to the right of the sound icon. In the scrolling menuhover over the sound icon – and it will play Activate sound.
Step 3: Click on the icon and the voice will be activated from there.

Character.AI
how to create a custom voice
To create your own voice sound on Character.AI, you will need to upload a clear audio clip between 10 and 15 seconds. So start by preparing that.
The service will use this clip to train the algorithm so that characters can respond in detail based on this short audio. You can preview the voice again, but it will now be trimmed down to around three seconds based on your intro and processed to sound a little cleaner and more robot-like.
Step 1: Once you have customized your settings, click Create a voice. If you choose to make your voice public, you will receive an additional confirmation notice, click Confirm and the voice will be available for use. Click on Do and you will see the voice in the voice section of your public profile.
From there, you’ll be able to add voice to any new characters you create. If you have made the voice public, it will be available within the Character.AI community for others to use for their characters.
If you ever want to remove the voice, you can select it in your public profile, click To modifyAnd DELETE.
2nd step: To get started, click Create on the Character.AI home tab, then click Voice.
Step 3: This will lead you to Create a voice page, where you can drag and drop your clip or click Upload to select your audio from files on your computer. Your raw audio will be automatically downloaded and you will have the option to preview it and re-download it if anything goes wrong.
Otherwise, you can then click Generate voice.
Step 4: The next page is a New voice Settings page, where you can enter details about your voice, including an introduction, voice name, and description. There is also an option to make your voice public.

Character.AI
how to add a voice to a new character
Including a voice is necessary to create a character in Character.AI, so the steps to do so are simple.
Step 1: Click on Create on the Character.AI home tab, then click Character. This will take you to the new character page where you fill out all the necessary details for a new Character.AI character, including name, tagline, description, greeting, and definition.
2nd step: When you get to the voice, click Add and a box with voice options will appear. You can scroll or search through the voice options in the Discover tongue.
Step 3: Go to Your voices to search through all the voices you have created. Hover over the desired voice and click Select.
Step 4: Fill in the rest of the settings information, then click Create a character to complete the process.
Step 5: Once your new character is live, you can interact with it like a third-party chat in your account and allow voices to hear your custom voices in your own chat.
Editors’ Recommendations