How to allow pop-ups on a Mac
When we talk about “pop-ups,” we bet one of the first thoughts that comes to mind is those aggressive mini-windows that take up valuable screen space when you try to browse a site . This is definitely a type of pop-up, but what if we told you that not all pop-ups are nuisances? Notifications from […]
When we talk about “pop-ups,” we bet one of the first thoughts that comes to mind is those aggressive mini-windows that take up valuable screen space when you try to browse a site . This is definitely a type of pop-up, but what if we told you that not all pop-ups are nuisances? Notifications from your favorite websites might be the kind of thing you don’t want to miss; and technically, they are pop-ups!
So is there a way to disable a few pop-ups on a Mac, without affecting the pop-ups you actually want to see? Yes there is! These settings are found right in macOS and it doesn’t take long to learn how to use them.
screenshot / Digital Trends
Enable pop-ups on Safari
Your Mac’s default browser makes dealing with pop-ups a breeze. Here’s what to do:
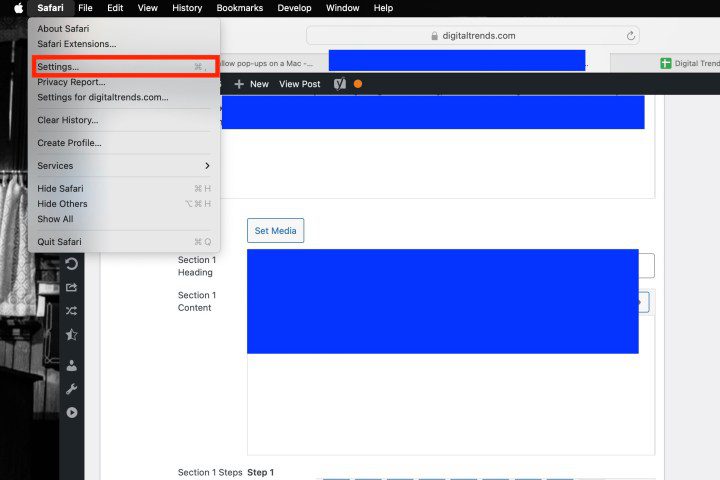
Step 1: With Safari active, click Safari located in the upper left corner, followed by Settings in the resulting drop-down menu.
2nd step: In a pop-up window, click the Websites at the top, followed by the tab Pop-ups entrance on the left.
screenshot / Digital Trends 
Step 3: To enable pop-ups on a specific website, click the drop-down menu next to the website name and click Allow. If you want to allow pop-ups on all websites, select Allow in the drop-down menu next to When you visit other websites located at the bottom.
Step 4: Finally, when Safari actively blocks a pop-up, a small notification appears in the browser’s address bar to let you know what happened. If you need this pop-up to enable a feature, you can grab it quickly. Just click on the notification and Safari will give you an option to show the pop-up.
This isn’t a great way to deal with pop-ups in general, but it’s useful if you occasionally see a pop-up but don’t want to change any of your settings permanently.
screenshot / Digital Trends 
Enable pop-ups on Firefox
Firefox is also a very common browser choice for Mac users, even more so since its Quantum redesign. If you use Firefox, learn how to enable pop-ups in Mozilla’s popular browser:
Step 1: In a Firefox window, select Firefox in the upper left corner, followed by Settings in the resulting drop-down menu.
2nd step: In the new Settings tab, click Privacy and Security listed on the left, and scroll down to the Permissions section.
Step 3: Uncheck the box next to Block pop-ups to enable pop-ups for all websites.
screenshot / Digital Trends 
Step 4: If you don’t want to enable all pop-ups, use the Exceptions button instead. This opens a new window where you can manually enter the website address — using the copy/paste method — and click the button Allow And Save changes buttons. You can add as many websites as you want to your exceptions and remove them as necessary when you’re done.
screenshot / Digital Trends 
Enable pop-ups on Chrome
Chrome is a popular browser among Android and Mac owners. The steps shown below explain how Chrome handles pop-ups and how you can manage them manually.
Step 1: With a Chrome browser window open, click Chromium listed in the upper left corner, followed by Settings in the resulting drop-down menu.
2nd step: A new Settings the tab opens. On the right, you should see a list of options, with Privacy and Security among them. Click on it.
Step 3: Select Site Settingsscroll down and click Pop-ups and redirects. You will see a new page with an option to switch between Blocked (recommended) And Allowed. Switch to Allowed to enable all pop-ups.
screenshot / Digital Trends 
Step 4: Below Allow, you can manually add individual sites to the pop-up allow list. This works well if you have another list of allowed sites that you can copy and paste into Chrome and save.
Step 5: You also have the option to automatically allow pop-ups from any site you visit in Chrome. When a page in Chrome blocks pop-ups, you will see a small icon in the address bar called Pop-up blocked, which looks like a window with an X on it. You can click this icon to allow the pop-up or choose to allow pop-ups from this particular site.
Note: You can also access the context settings by typing chrome://settings/content/popups in the address bar.
screenshot / Digital Trends 
What about third-party apps?
Third-party ad blocking apps like Adblock Plus eliminate ads and pop-ups. As you can see in the image, external apps provide a visual indicator of the current number of ads they have blocked.
However, you may also need to enable pop-ups in these apps because they might incorrectly identify and block innocent pop-ups. When you visit a site where you need pop-ups, click the AdBlock icon and find a way to add the site to your whitelist or disable blocking for that specific site. You should keep this in mind when using these third-party apps because the majority of them have this feature.
Can pop-ups harm my Mac?
We all see pop-ups on our computers. As noted in this article, not all of these notifications are malicious, but some certainly are. For the most part, the pop-up itself is not dangerous unless you click on it. If the pop-up is designed to load malware and other harmful viruses onto your PC, in most cases, one click is enough to begin the sabotage.
Fortunately, pop-ups have been around for a minute, so users are getting very good at spotting errors. If you have a hunch that you are receiving fake macOS notifications, we recommend visiting Apple’s many support pages on this topic.
Editors’ Recommendations